Easy Flash Photography: BEST Lighting Modifiers (Tutorial and Techniques)
May 05, 2023
As a photographer, lighting is a crucial aspect of capturing the perfect shot. Today, I want to share my thoughts on using a beauty dish and other lighting equipment to enhance my photos.
In the beginning, I started by using natural light and adding lights to it. This is the first step I take when I start a photoshoot. However, it's important to enhance the natural light in a way that doesn't overpower it. This is where a beauty dish comes in handy. I have gritted the beauty dish to control the light, preventing it from hitting the background, and also added a diffusion layer to help with specular highlights.
I decided to go for a dramatic look with this shoot, meaning I want to have a little fill light to prevent too much shadow on one side of the subject's face. To avoid "mom circles," I positioned the beauty dish so that the light wouldn't come from directly above the subject's head. I also used a very small reflector to fill in some of the shadows on the face.


Next, I added a profoto b10 and a large umbrella with a diffuser to fill in the shadows in the subject's face. I placed the light close to the subject and adjusted it until I was satisfied with the result. It was important to avoid any shadows on the wall behind the subject, so I had to be careful about the position of the light.
I started by using TTL (through-the-lens) metering to get the initial exposure but ended up switching to manual to have more control over the light intensity. I gradually lowered the light until it was just enough to fill in the shadows.
I am always on the lookout for new ways to enhance my craft and bring my vision to life. Recently, I decided to experiment with some new lighting modifiers and techniques. I must admit, I was a bit intimidated at first, as I had never used a snoot before. However, I was eager to try something new and expand my skill set.
I started off by using the snoot with my Canon EOS R camera and 20-72.0 lens. The snoot directed the light very intensely and I was able to create a golden haze, darkening out the entire scene except for my model's face. I was impressed by how versatile the snoot was and how it allowed me to control the light source. I know it will definitely be a valuable addition to my camera bag.


Next, I moved on to one of my all-time favorites - the OCF gels. I used them to give my model, Elena, a beautiful hair light. I shot with natural light and used the golden color of the gel to bring out the red in her hair. I positioned the light behind her and to the side where most of her hair was. I also dialed in the color temperature to make it even warmer, which helped to exaggerate the effect of the gel.
I then switched over to my 135mm lens to create a nice golden glow and haze across the whole scene. I also switched back to my 28-70 lens to show how the barn door shaped the light. The barn door allowed me to control the beam of light with more variety and fine-tune it to my desired effect. I demonstrated how to light a subject from top to bottom, keeping the barn doors open vertically to avoid lighting the wall and spilling light on the ground.
In conclusion, I had a blast experimenting with these new lighting modifiers and techniques. I can’t wait to put them into practice on my next shoot. Whether you're a seasoned photographer or just starting out, I highly recommend trying out these techniques for yourself. You never know, they might just become your new favorites!
Are you ready to stop guessing and start growing your photography business with proven strategies?
My Mastermind program is designed for photographers who want to scale, find freedom, and build a business they truly love. Inside, you’ll get personalized coaching, step-by-step guidance, and the community support you need to thrive.
See if it’s the right fit for you: https://www.breatheyourpassion.com/photo-insiders-mastermind-optin

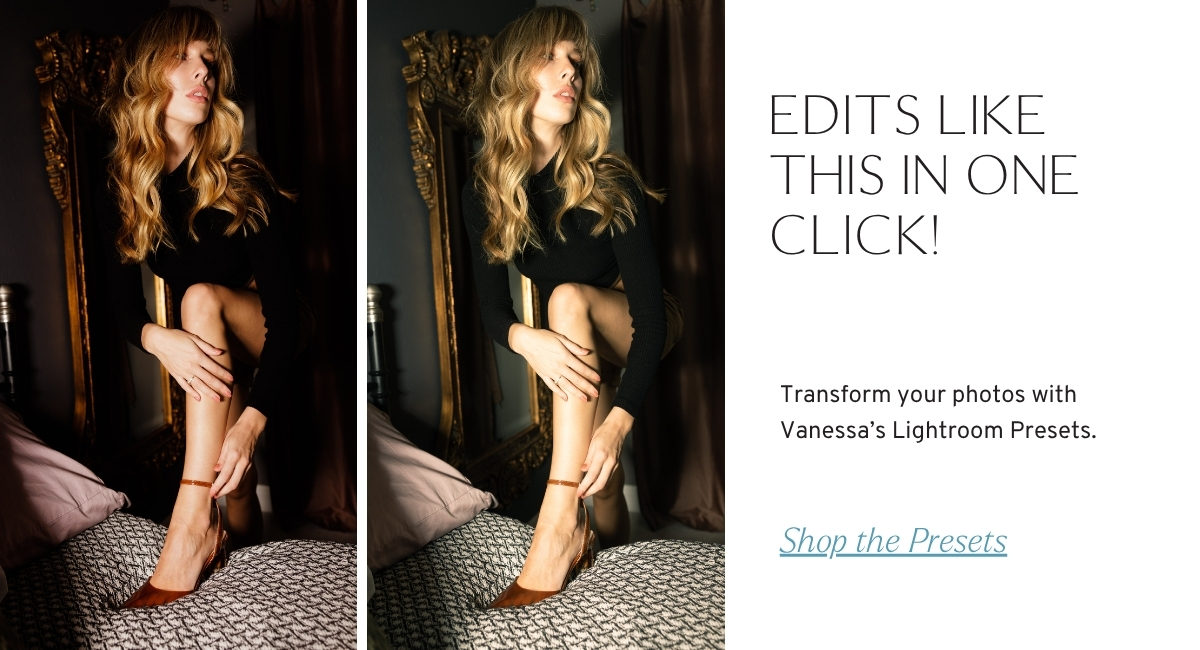
Want my Lightroom Presets? Here's your way to the shop: https://vanessajoy.samcart.com/products/the-complete-editing-bundle